border

border
Showing posts with label fun art. Show all posts

Wednesday, June 3, 2015

Drawing the hibiscus


This was a pretty straight forward and simple lesson comfortable for small kids.

A very easy to follow instructions made all tiny tots draw and color the beautiful big flower with so much confidence.


What we need:


Art block
Poster colors/ water colors
Crayons

How we did:

Drawing:


1. Make a dot in the center of the page.
2. Draw a huge 'V' spreading out from the dot.
3. Draw another V vertically down/ turn the paper and draw a 'V'.
4. Draw a line between the two Vs. Now we have a basic five lined flower skeleton.
5. Once again we went drawing smaller Vs on each end of the line .
6. Connect the Vs with wiggly lines.
7. Draw two curved line for the pistil.
8. Draw the stem and leaves(simple leaf shape for little ones)

Coloring:


Use a yellow crayon or pastel to shade out from the center of the flower.
Use brown/orange crayon for the pistil and dots for the stigma
Use read poster color for the entire flower, the yellow shading and the pistil are safely done with crayons.
Green for leaves and stem and light blue for the background.


What we learnt:


We refreshed our memories about primary colors and drawing using alphabets.

Random Picks:


see you soon

Scream Art


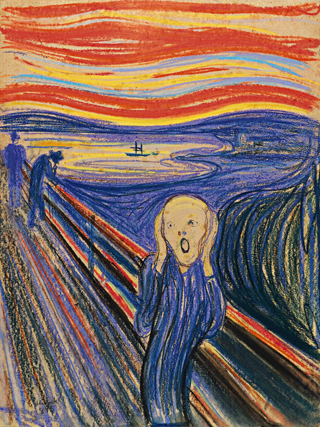
The Scream - Edward Munch


When I was looking for a unique artist appreciation lesson, (I had decided to do the spooky
 'The scream' painting of Artist Edward Munch), I stumbled upon this picture.


 And I immediately knew I had to try this.
So much for the entertainment of the kids - this lesson proved to be a crowd pleaser at all times.

Kids will  absolutely love it.

What you need:


Art block
Liquid acrylics/poster colors/oil pastels
black marker
Straw

How to do:


Kids were told to draw a circle/oval for the face starting from the center of the paper down to the bottom.
The face was developed according to their taste. Some chose selfies while others went for creepy boys and clowns even.
The bust was done.
Everything was outlined with a sharpie as we always do with our projects.
Colored in with bright colors since we also wanted this to be more whimsical in nature than spooky.
Now comes the fun part - Each kid used a straw to dab the diluted colors and blow it on the paper starting from the head to the top of the page. The more you blow the more streaks. Kids had fun experimenting moving the paper, making branches and mixing colors while blowing.
At the end of session - we had a messy classroom full of grinning kids.

What we learned:


Before moving on to the project we had a visual of Edward Munch's The scream painting and discussed on his choice of colors and strokes. How the directional strokes and choice of colors can be manipulated to create mood.
How to create expressions in face.

Random picks:


see you soon